Rib Baskets & How to Shape Them
What are "RIB" baskets?
AKA melon baskets, buttocks baskets, peanut baskets, gizzard baskets, bow baskets, fanny baskets, egg baskets and many other regional names. This is the basket with the familiar God's eye or "ojo de Dios" wrapped pattern on each end. Wherever you travel in North America, you'll more than likely see rib baskets.
ORIGIN
Although now found world-wide, rib baskets originated in Europe and were very common in Britain. Since many settlers in North America came from the British Isles, rib baskets traveled across the Atlantic, appearing logically in the Eastern colonies. As the settlers headed into the mid-Atlantic, through Pennsylvania, down the Appalachians, across the Cumberland Gap, across Kentucky, and Tennessee, into the Ozarks and beyond to Oklahoma- so did the rib basket. Not necessarily in that order. Simultaneously, settlers carried this style north into Maine and Canada.
So it came to be that Native Americans also wove this particular style- as they were influenced by the baskets entering their territories.
Native North American vines were used to replace the willows of England. As creative folk everywhere do, settlers experiment with whatever grows in their area. The rib baskets that we think of as traditional styled egg baskets are usually made of split hardwoods, but this style also works well in honeysuckle and others.
How to Shape Rib Baskets
Here's a quick and easy tip that I use to get my Rib Baskets (aka melon, potato, egg, etc.) perfectly shaped:
Contents are copyright V I Reed & Cane Inc. If you are reading these entries from a location other than Basketweaving.com, that means that the source has stolen our copyrighted content.
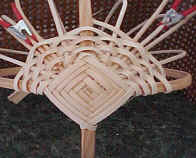
See where I've added the extra spokes to a 10" basket?
There are 4 spokes added about an inch into the weaving: one on each side of the red clamps.
Total: 4 new spokes.
These new spokes were added in the usual way, tucking them into the weaving.
However, on the OTHER SIDE of the basket, I, not only tucked the opposite ends of the spokes
into the basket,
but I also pushed the ends right through the weavers so that they are sticking out.
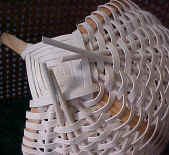
This is what it looked like on the opposite side of the basket, after weaving about 10 rows.
By doing this, while I'm weaving the center rows of the basket,
I can pull on the spoke ends to make the basket flatter or rounder,
as I look at the profile of the basket that I'm weaving.
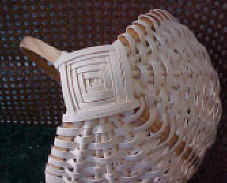 When I'm completely finished with the basket, I can trim those 4 spokes to a point,
and hide the ends under the next weaver. Look closely and you'll see where I mean.
Voilá! Perfect shaping!